Monday, May 27, 2019

Printing your patterns: The importance of making sure your printer settings are correct.


I recently got a query from a customer about the size of my patterns. She was confused as she had bought a 12" pattern and after printing the pattern and sewing it she sent me a message asking if it should be 12" with the seam allowance or 12 ½" inches.

After I replied telling her that it should be 12 ½ with the seam allowance, she sent me a message stating that she had finished her pattern and it was only 12" and where was the extra ½" allowance?

This was a tricky one for me. I like to have happy customers and she was clearly not happy about how her pattern had turned out too small. Which I can fully understand, as having taken the time to sew a pattern, only to discover it was smaller than you thought would be very disappointing. However, on the other hand, I knew this was not a problem with the pattern, but the way it had been printed. I printed it out myself to double check. Plus I've made this mistake myself in the past. 

I asked her to check her printer settings and ensure she had printed to "actual size". It turns out this can be difficult to find on some printers and can also be called "scaling", but it is very important. There can be a very significant difference between the size a pattern should print at and the size the printer decides to print, especially if you are printing on A4 paper.

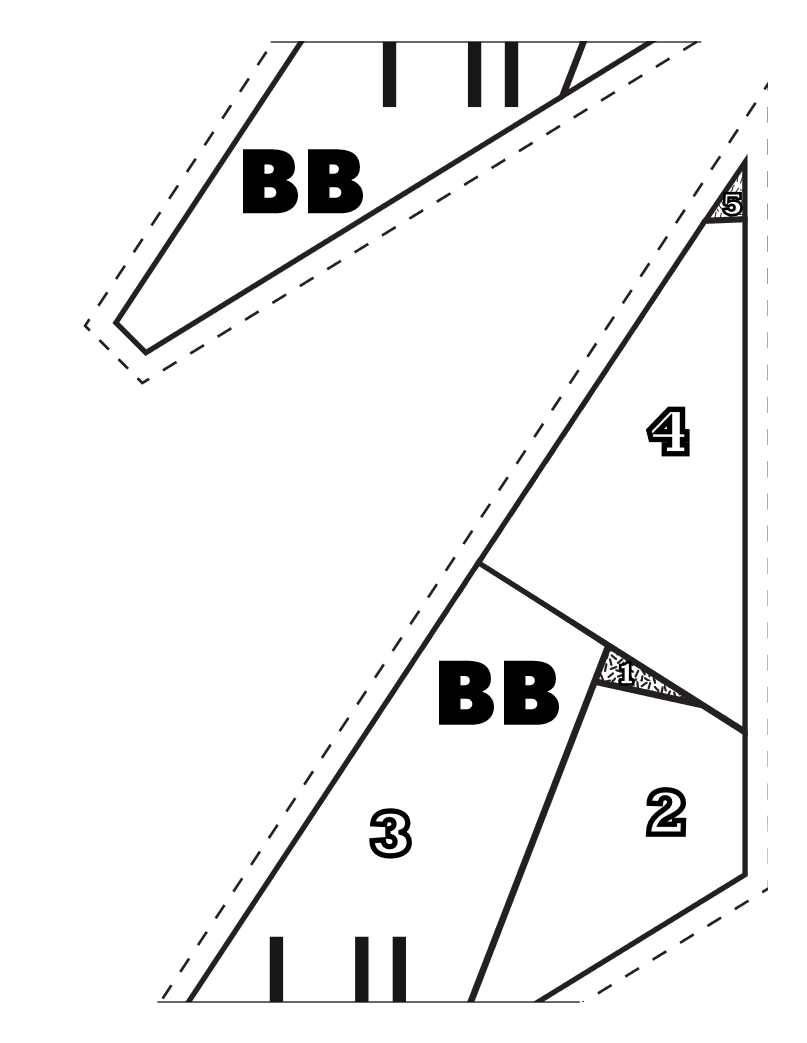
Here's an example: The picture behind is the pattern printed at actual size and the piece in front is where the printer decided to "fit" the pattern to the page.


You can see there is a quite significant difference in the size of the pattern, which quite easily translates to a loss of ½" or more across the entire 12" pattern.

Believe it or not – I sell more patterns to the United States of America than anywhere else in the world. Therefore when I format my patterns, for the most part, I format them to a "Letter" sized document. Why?


1.     It makes it easier for the majority of my buyers whose printers are formatted to Letter sized paper.
2.     It still works for those printing on A4 provided they print actual size.


I have tried my best both within my listings before you purchase and within the pattern itself, it is clear you need to check your printer settings before you print, but in this case – my messages failed.

How can you avoid making the same mistake?

Download your pattern to your computer rather than printing from a web browser. It is possible to print to actual size from a web browser, but it's more complicated, for example in Chrome you need to select Scale, Customized "100", such as the picture below:


Check your printer settings every time you print. You never know when those cheeky little gremlins have gone in and had a fiddle with your printer settings (Or in my case – it was me and I just forgot about it).

Measure your test box! Most designers include them - and they are there for a reason. 

I really hope this has been helpful for you and if you think of any other ways for me to help remind you in my patterns to print to actual size please let me know!

Happy Piecing!

RJ

Thursday, May 23, 2019

A little bit about me...

Hello and thank you for stopping by my blog! 

I’m RJ, I am a sewer, quilter and quilt pattern designer based in New Zealand. I love Foundation Paper Piecing as well as other methods. Primarily I love creating quilts that will be loved and used. 


Why Kohatu? 
Kohatu is a place in the top of the South Island. You know what is there? A cafe (it used to be a pub) and a farm. There is nothing else there. Most of the time, it doesn’t even register on a map. But I grew up on that farm and that’s where I first learned to sew. I was taught by my grandmother on her Bernina Record 530-2 which was first purchased in the early 1960s. Given I felt a strong connection between my sewing, and where I grew up, I felt Kohatu Quilt and Patterns was an appropriate name.

Things I love:

My sewing machine: 


My Grandmothers’ Bernina has survived sewing and mending clothes for my grandmother, her 6 children and over 20 grandchildren and now this machine belongs to me and I still use it on a daily basis to sew quilts, bags, and clothes for my son. This Sewing Machine is a real testament to the quality of Bernina Sewing Machines.


 It’s still in the completely original condition even has the original knee pedal! I have my eye on either a Bernina 570QE or a Husqvarna 965Q (tough choice right?) for when this machine sews its last stitch, but don’t tell my husband - he says we could buy a small car for the same price! 

My Olfa Pink 45mm Rotary Cutter:


It's a Limited Edition. Enough Said. 

Nido Wool Pressing Mat
I purchased this mat recently and it is A-Maz-Ing! You know the saying "You can be a C-Grade Sewer as long as you are an A-Grade ironer"? I was firmly C-Grade in both aspects. Since using this mat, my ironing has improved and my finishes are so much neater! I highly recommend it.

Foundation Paper Piecing 
When I first started quilting, It was basic squares and rows. I always looked at complex patterns and thought they looked too difficult for me. Then I started watching YouTube videos and realised that it wasn't as hard as I thought it would be. When I couldn't find tractors and diggers and trucks for a quilt I wanted to make -  I designed my own!


This farm tractor pattern is the first design I ever created and is still one of my favourites today!

Fabric: All kinds of fabric... seriously I will use anything I have on hand, but I especially like Bounce by Allison Harris

Monday, May 20, 2019

Check out the new Pop-Art Baby Quilt - The Shape - O Quilt!


Isn't it funny how inspiration can strike you at any time and anything you see could be a quilt pattern? I was inspired to design the Shape-O Quilt while I was cleaning up the kids' toys in my house one day. I had a quick look and couldn't see any other quilt pattern quite like it - but there should be, right? Tupperware's Shape-O Toy Puzzle has been in households since the 1960s and is still loved by children all over the world!

At first, I thought that I would just make a block for the Shape - O Ball, but it quickly grew into a full-sized quilt pattern, which would make an excellent baby quilt. The pattern includes 11 foundation paper pieced blocks, all the shape - blocks are representative of the actual shapes included with a Shape-O Toy. 


Then I added the 2" border, using a fabric called 'Shape Up' by Little Quack Fabrics on Spoonflower. The finished quilt measured 26 x 26", which made it a great size for a bassinet blanket:


After drafting the pattern and making my first version, I discovered that I had included a very generous fabric allowance, however, I figured that it's always better to have too much than too little and I could use my leftover in other projects in the future. I also wanted to make sure there was enough for someone who pieced differently or someone who is new to the technique and needed a bit more for mistakes. 

Lisa was one of my testers for the quilt and she changed the layout on her quilt slightly, but it still looks very effective. 


Lisa said " this pattern is so cute and is very nostalgic for me, I remember playing with this toy at my grandparent's house as a child. I love that Tupperware is still making them, we were gifted a purple and pink one after we had our daughter!".

 I think Lisa's Quilt looks great with the grey background. Lisa also said she liked the fact that the fabric allowances were so generous.


Many of the testers noted how many memories this quilt brings back. Joanne said her 39-year-old son saw hers and said: "I remember those". She is planning to auction her quilt off for charity.


My own second version of this quilt came about after I saw a new range of fabric from Windham Fabrics were released. The range was called 'Bounce' by Allison Harris from Cluck Cluck Sew. I was really excited about the range, as I loved the fabric combinations available and it seemed even more fitting when I read that Allison had designed this fabric after being inspired by watching her children play!


I searched all of my local quilt shops and every online quilt shop in NZ to no avail in my attempts to locate some of this fabulous range of fabric. In the end, I ordered it from the Fat Quarter Shop in the United States. Initially, I thought I would be waiting a few weeks for it to arrive, but my order(s) arrived quite quickly, within a week or so of placing the order. 

The Shape-O Quilt is now available in my Etsy store. I also included an option to use Applique on the smaller shape blocks on the outside, if that is your preferred method. 

Happy Piecing! 

RJ


Saturday, May 4, 2019

WIN a Mini Charm Pack!


WIN! An 'Ahoy' MINI Charm Pack by Gingiber for Moda Fabrics


This month I'm giving away this fantastic Mini Charm Pack to one lucky person. It includes 42 squares of fabric measuring 2 1/2" each. This is a really cool collection of fabric that features whales, turtles, crabs, and some cool ocean-themed blenders. Some of the fabrics are duplicates, but they are all so cute!

You can check out the full collection of these fabrics at fatquartershop.com

To Win:

  1.  Subscribe to my newsletter here
  2.  Comment below and tell me what you will make with it if you win!


Entries close on June 21st 2019. One winner from eligible entrants who have completed both tasks will be drawn at random and contacted by email within 3 days. If there is no reply within 3 days, another random winner will be drawn.


Wednesday, May 1, 2019

Foundation Paper Piecing - Is a fancy paper worth the extra cost?

When I do my Foundation Paper Piecing, traditionally I have simply used plain printer paper that you can buy ever-so-cheaply from your local stationery store or supermarket. I have read other quilt blogs and noticed that some of them recommended using Vellum paper to do Foundation Paper Piecing, so I decided to give it a go. This is what I discovered:

The Cost

I went to Warehouse Stationery and purchased myself some of this:

The cost of buying Vellum Paper from the stationary store was much higher than using normal printer paper. Printer Paper costs around $5 NZD for 500 sheets. Buying Vellum Paper, on the other hand, cost me close to $10 NZD for only 10 sheets. So given the cost is so much higher (almost $1 per sheet) I had hoped that this would be a good investment and I would really enjoy using the vellum so the cost would not worry me.

Working with Vellum Paper

I got the Vellum Paper home and immediately printed off one of my patterns. It printed very well. The lines came out very clear and because it was slightly transparent, it was easy to see through and much easier to place my fabric correctly. It was also very stable. At this stage, I thought I was onto a winner.


However, I ran into difficulty because I found it was exceptionally slippery to work with compared to the other paper I use. To make matters worse, when I ironed my seams open, the vellum curled a lot, making it even more difficult to work with. This meant that it was harder to accurately trim my seams. Just to clarify - I did not use the steam function on my iron, I never do when I'm paper piecing as I just cannot risk the ink from the paper running and ruining my fabric, plus the only time that I have seen my normal printer paper curl, was after it got wet from some residual water on the ironing board. So a wet iron was not the problem.


Lastly, when I went to remove the vellum from the back of my block, it was both easy and difficult at the same time. At first, it seemed as if the vellum would tear as one piece a lot easier, which is great for removing the paper from the smaller sections. I liked this until I discovered that it had become brittle in places and when I was removing the vellum it was pulling a bit too much at the seams and straining the fabric around it. I felt like I was at risk of tearing my fabric or the stitches which I really did not like.

Conclusion

While I admit that some of the problems may have some simple solutions, for example, tightening up my stitches might help perforate the vellum more and cause less strain on the stitches, I still would not use vellum paper again. Quite simply between the cost of the paper, and the difficulty I had using it, from now on, I will stick to using my cheap printer paper.

I also note that my test may not have been equal in all aspects. Normally the printer paper I buy is 80gsm, whilst this was 90 gsm, it was the only vellum paper available in the store and I thought given it was only 10gsm different, the weight of the paper wouldn't be a problem, however maybe I am wrong.


I'd be interested to hear your thoughts, have you used vellum paper? What were your thoughts?

Happy Piecing!

RJ

Tuesday, April 30, 2019

The Chicken's have come home to roost!

During April as part of the Kohatu Patterns Farm Animal Quilt Along, we created some awesome looking Chooks for our quilts. I couldn't decide on a favourite this month, as they all looked great!

I loved the yellow chicken which Julia created below. She's a bit scrappy and yet also has a bit of a subtle look against the white background:


 Truus made her chicken a beautiful spotty Brown:


 My chicken was a bit of Yellow mixed with some Orange Solids:


and Donna also made a Brown Hen, but with a little more contrast: 


The Chicken Pattern is in my Etsy store now and is already proving to be quite a popular pattern.

The next animal we are tackling is a Billy-Goat, and so far he is proving to be quite gorgeous! I'm looking forward to seeing what my lovely Quilt-Along buddies come up with for next month's Goat Pattern too!

Happy Piecing!
RJ

Tuesday, April 23, 2019

I'd like to introduce you to a Lady in Red... Guest Blog Post byNessie505


Hello!

I am Nessie and I have taken this blog hostage for the day! I am a Foundation Paper-Piecing pattern designer. Today I am going to go over the basic steps in the FPP pattern making process. I have a new pattern, “Lady in Red,” and will use that quilt pattern as an example! 


Steps to making a Foundation Paper Piecing (FPP) Pattern:
  1. Choosing inspiration
  2. Design the pattern 
  3. Make the template pieces
  4. Template Layout
  5. Piecing Diagrams and Directions
  6. Pattern Testing
  7. Publishing


Choosing Inspiration


This is one of my favorite steps! My artistic mind goes crazy with ideas. I have to reign it in while I do research because there are several important things to remember.

  1. Choose something you like! I tried making custom patterns for others, and honestly, it was hard because I just didn’t feel like it was mine.
  2. Copyright. If you are using copyrighted artwork, you could be breaking the law. If you are designing a Star Wars quilt for your grandson, no big deal. If you want to publish the pattern, do research and make your own sketch to use as inspiration.
  3. Keep it simple! Few colors, for me I try to keep it at around 5-8 colors max, though I have seen plenty of quilts that use much more. The less detail the easier it is to design.
For ‘Lady in Red’ I used a digital sketch I drew, avoiding any copyright issues. The sketch is also fairly simple with only 5-6 colors.  

Pattern Design

There are two main ways to do this. Using software like Adobe Illustrator or using tracing paper. The basic steps are the same using both methods. 


1.     Decide on the size of your block – I use Adobe Illustrator and my favorite block size is 18 X 18 inches. The blocks turn out big, and the template pieces usually fit really well on 8.5 X 11 letter paper. If you are using tracing paper you can go with the size of paper you have or tape pieces together to get to the desired size.
2.     Block your paper piecing pattern – I use 3 line sizes (some patterns may need more or less but I found this works for all my patterns so far). Large lines to block the biggest blocks, medium lines to denote the smaller blocks, and small lines denote the sewing lines within each block.
3.     Color and get feedback on the first draft –Color your first draft. Does it look right, do you need to make changes? Ask friends if they like it and listen to what they say.
4.     Final Draft!

Template Pieces

This part takes some time so buckle up:


As you can see in the diagram above, I have labeled the template pieces from “Lady in Red.” Notice I used numbers and letters to aid in piecing. I also used a pattern fill as a fabric color guide on the pattern. 

  1. Number and label your template pieces in the order you will piece them. 
  2. Color code your pattern – you can use symbols, patterns, even colors. 
  3. Seam Allowance? – I like having a ¼ inch seam allowance on my patterns, others don’t.

It’s your pattern, so decide what works for you. This will require a few extra steps if you are using tracing paper.

Template Layout

If you are using tracing paper, this step can be skipped. If you are using software like Adobe illustrator there are a few options:


1.       There are 3-4 main sizes of paper you can print your templates on.
a.      Letter and Legal (A4) Paper – Pro: can be printed on most home computers. Con: larger paper template pieces may need to pieced and taped. 
b.     Poster paper up to 36 inches in width and unlimited length found in most copy shops. Pro: No need to piece large template pieces. Con: extra cost in printing at a copy shop.
2.       Use marks to aid in joining paper template pieces.


Pattern Instructions and Piecing Diagrams


Above is a template piece layout example with ¼ inch seam allowance (dashed line) and marks (thick black lines) on the template where the template piece needs to be taped. 

Piecing diagrams and directions are both important.

1.  Who is your audience?
a.       You - what do you need to make sense of a pattern? If you are experienced and it’s your own design, you may only need piecing diagrams.
b.      Publishing – is it for beginners or experienced quilters? I consider FPP a hard skill, therefore, I never recommend a beginner to try my patterns.
2.   Skills required? – Do you want to teach how to do FPP in the pattern or do you just want to focus on the pattern? I tend to focus on the pattern and skip the teaching.
3.  Fabric yardage considerations – FPP patterns are interesting in that often you need yardage of a couple fabrics, and scraps or fat eighths is enough for the other colors.

Testing the Pattern


You are always the first tester! Depending on your future use you may need more testers!
1.      I always find mistakes in my patterns!
2.     Others may notice mistakes you didn’t.
3.     Versatility and Feedback
4.     How long? Give them some amount of time and expect them to take at least twice that amount of time.
5.     Incorporating feedback

In my design, I made the background and face the same color. When I got quilts back from testers, almost all of them had the background and skin different colors. Do I need to rewrite the pattern? No, I instead included a page at the end with instructions on how to label your template pieces if you want to change the color of the sky, earrings, or hat.

Publishing

There are few easy ways to self-publish your patterns:
1.       Etsy – downloadable PDFs (This is where I started publishing)
2.       PayHip – downloadable PDFs
3.       Wordpress – downloadable PDFs
4.       Printing and Selling – great for pop-ups and vending

Thanks for reading. I really hope some of you are inspired to make your own FPP patterns! I would love to see your creations so please give me a like and follow on Facebook and Instagram @ByNessie505, and tag me in your FPP photos!


Lady in Red is available in Nessie's Etsy Shop from 24th of May 2019